Setting Up Your Synology NAS: A Guide for First-Time Users
Introduction: Welcome to Your Synology NAS: Getting Started with Software Configuration
This guide is designed to assist individuals who are new to the world of Network Attached Storage (NAS) and have recently acquired a Synology NAS. Having already completed the physical setup of your device, including unboxing and installing your hard drives, the next crucial step is configuring the software that will bring your personal cloud to life. This blog provides a comprehensive, step-by-step walkthrough of the essential software configuration procedures, ensuring a smooth and successful initial setup of your Synology. The process, powered by Synology's intuitive DiskStation Manager (DSM) operating system, is designed to be manageable even for those with limited prior experience with NAS devices. By following the instructions outlined in this guide, first-time users can confidently navigate the software setup and begin leveraging the numerous benefits of their new NAS.
Step 1: Initial Connection and DSM Installation
Connecting the Hardware
The first software-related step involves establishing a connection between your Synology NAS and your network. It is paramount to ensure that the NAS is physically connected to your network router using an Ethernet cable. This wired connection provides the initial pathway for software configuration. Additionally, verify that the NAS is powered on; a lit power LED on the front of the unit serves as a visual indicator of its operational status. This physical connection forms the fundamental groundwork for all subsequent software configurations.
Finding Your NAS on the Network
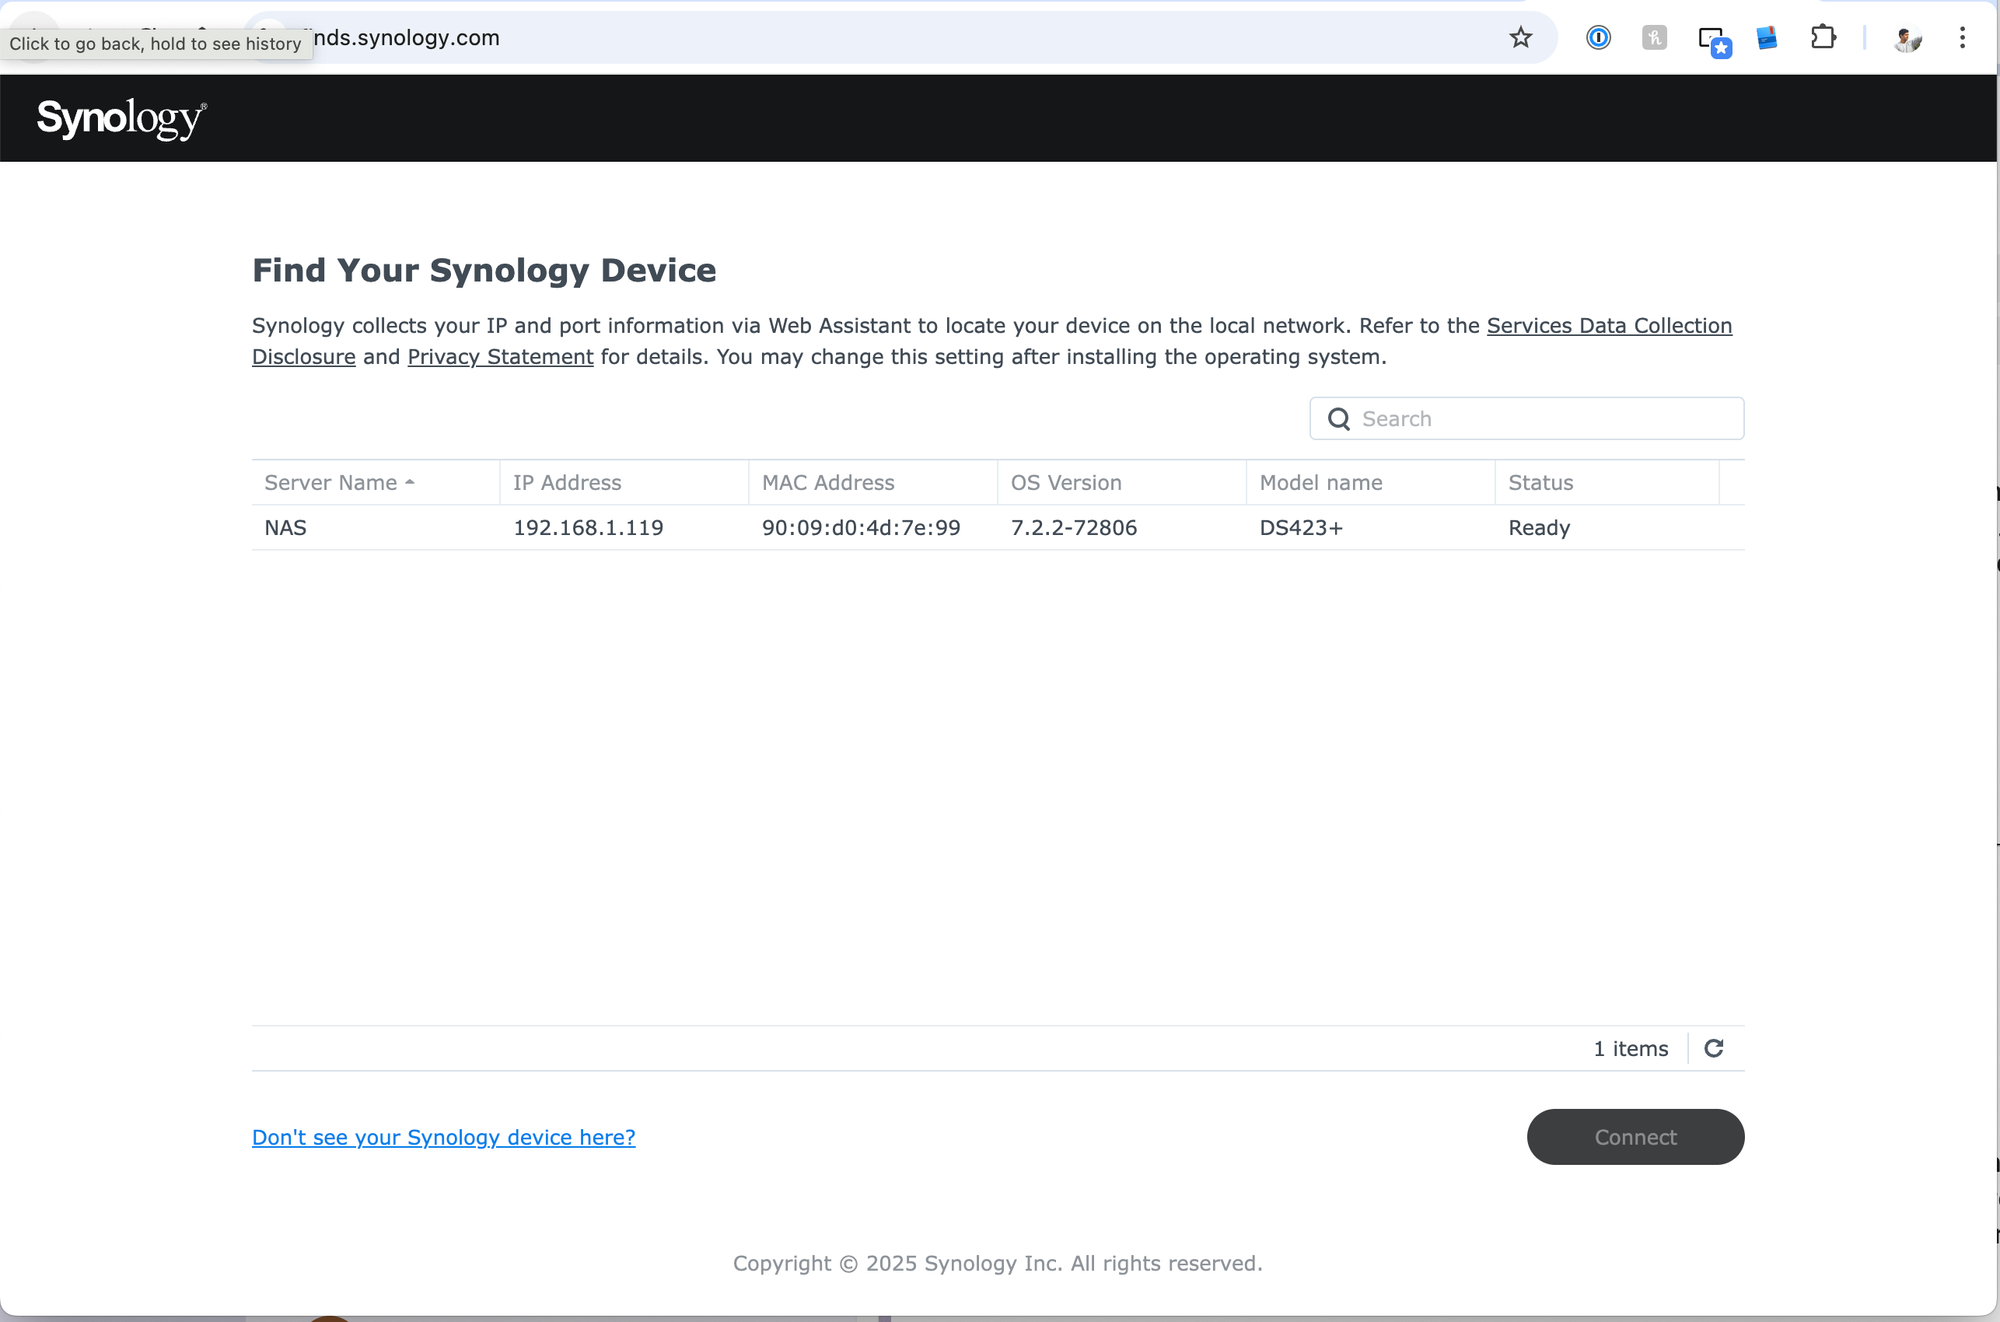
Once the hardware is correctly connected and powered on, the next step is to locate your NAS on your network. Open a web browser, with Chrome, Firefox, Safari, or Edge being recommended for optimal compatibility. In the browser's address bar, type find.synology.com and press Enter. This will launch the Synology Web Assistant, a utility designed to scan your local network for Synology devices.
Installing the DiskStation Manager (DSM)
After the Web Assistant discovers your NAS on the network, it will display the device, and its status will likely be indicated as "Not installed". To begin the software installation, click the "Connect" button. You will then be prompted to install the DiskStation Manager (DSM) operating system. Click "Install" to proceed. A warning message will appear, informing you that all data on the installed hard drives will be erased during the installation process. Carefully read this message, and if you understand and wish to continue, click "Continue". The Web Assistant will then automatically download the latest version of DSM from Synology's servers and install it onto your NAS. This process may take approximately 10 to 20 minutes, and it is crucial to be patient and avoid interrupting the installation. Once the installation is complete, your NAS will automatically reboot. After the reboot, the Web Assistant will reappear in your browser. Click "Connect" again to proceed with the initial DSM setup.
Initial DSM Setup Wizard
Following the DSM installation and the subsequent reboot, the Web Assistant will guide you through the initial setup wizard. This wizard will walk you through several essential configuration steps to personalize your NAS.
(a) Creating an administrator account: The first step is to create an administrator account for your NAS. You will need to choose a strong and unique username and password. For security reasons, it is strongly advised to avoid using "admin1" as the username, as this is a common target for malicious attempts. Selecting a non-default username and a robust password is a fundamental security practice that should be implemented from the outset.
(b) Giving your Synology NAS a server name: Next, you will be prompted to give your Synology NAS a server name. This name will be used to identify your NAS on your network, making it easier to locate and access.
(c) Configuring automatic DSM updates: The wizard will then ask about automatic DSM updates. It is generally recommended to enable the automatic installation of important updates. Regularly updating DSM ensures that your NAS benefits from the latest security patches and stability improvements, safeguarding your data and the overall health of your system.
(d) Optionally creating a Synology Account: Finally, you will have the option to create a Synology Account. This account provides access to Synology's various online services and features, including QuickConnect, which allows for easy remote access to your NAS without the complexities of port forwarding. While optional, creating a Synology Account unlocks valuable functionalities that can enhance your overall NAS experience.
Once you have completed all the steps in the initial setup wizard, you will be automatically logged into the DSM desktop, marking the successful completion of the initial software configuration phase.
Step 2: Configuring Your Storage with Synology Hybrid RAID (SHR)
Understanding Storage Pools and RAID
A storage pool in DSM serves as a foundational layer for organizing the physical hard drives installed in your Synology NAS. It acts as a logical unit that groups together one or more drives, allowing DSM to manage them collectively. On top of the storage pool, you create volumes, which are the actual storage spaces where your data will reside. RAID (Redundant Array of Independent Disks) is a technology used to combine multiple physical drives into a single logical unit for the purposes of data redundancy and/or performance enhancement.
Introduction to Synology Hybrid RAID (SHR)
Synology Hybrid RAID (SHR) is an intelligent and flexible RAID management system developed by Synology, specifically designed to simplify storage management, particularly for users who may be new to RAID concepts. A significant advantage of SHR is its ability to optimize storage capacity when using hard drives of different sizes. Unlike traditional RAID configurations that often require drives of identical capacity to maximize efficiency, SHR can intelligently allocate space, ensuring less wasted storage. Furthermore, SHR offers ease of use, automating many of the complexities associated with traditional RAID setups, making it an ideal choice for beginners. When configured with at least two drives, SHR provides one-drive fault tolerance, meaning your data remains protected even if one of the hard drives fails.
Creating a Storage Pool using SHR
To begin configuring your storage, open Storage Manager from the DSM Main Menu. In the left sidebar, navigate to Storage. Click the Create button and select Create Storage Pool. The Storage Pool Creation Wizard will appear; click Next. On the next screen, you will be asked to select a RAID type. Choose SHR (Synology Hybrid RAID). This option is highly recommended for its flexibility, especially if you are using hard drives with varying capacities. Click Next. You will then be prompted to select the hard drives you want to include in the storage pool. Select all four of your installed hard drives. Click Next. The wizard may ask if you want to perform a drive check. While optional, it is advisable to perform this check, especially with new drives, to identify any potential issues. Click Yes to proceed with the check or No to skip it. Click Next. To maximize your storage capacity, allocate the maximum available space to the storage pool by clicking the Max button.
Selecting the File System (Btrfs Recommendation)
For the file system, it is strongly recommended to choose Btrfs. Btrfs offers advanced data protection features, most notably the ability to create snapshots. Snapshots allow you to take point-in-time copies of your data, which can be invaluable for recovering files in case of accidental deletion, corruption, or even ransomware attacks. Click Next. Finally, review your settings to ensure they are correct and click Applyto create the storage pool and the initial volume. You will receive a warning message about data erasure; click OK to confirm.
Step 3: Enhancing Performance with SSD Cache
Understanding SSD Cache and its Benefits
Your Synology DS423+ is equipped with two M.2 NVMe SSD slots, which can be utilized to create an SSD cache. An SSD cache is a layer of high-speed solid-state drive storage that sits between your frequently accessed data on the slower hard drives and the system's memory. By storing copies of this frequently accessed data on the much faster SSDs, the overall performance of your NAS can be significantly improved, leading to quicker access times for applications and files. NVMe (Non-Volatile Memory Express) SSDs, which can be installed in the M.2 slots, offer particularly low latency and high input/output operations per second (IOPS), making them ideal for caching purposes.
Choosing the Right SSD Cache Mode (Read-Write)
DSM offers different modes for SSD caching. A read-only cache stores copies of frequently read data, accelerating read operations. A read-write cache, on the other hand, accelerates both read and write operations by initially writing data to the SSD cache before it is eventually written to the hard drives. Given that your DS423+ has two SSD slots, it is recommended to configure a Read-write cache, as this will provide the most comprehensive performance enhancement for your system.
Configuring RAID 1 for SSD Cache Redundancy
Since you have two SSDs available, it is crucial to configure them in a RAID (Redundant Array of Independent Disks) configuration for data protection. For a read-write cache with two SSDs, the recommended RAID type is RAID 1. RAID 1, also known as mirroring, writes the same data to both SSDs simultaneously. This means that if one of the SSDs fails, the system can continue to operate using the other SSD without any data loss. While the primary purpose of an SSD cache is to improve performance, implementing RAID 1 ensures the resilience and availability of the cache itself.
Creating the SSD Cache
To set up the SSD cache, open Storage Manager from the DSM Main Menu. In the left sidebar, navigate to Storage. Click the Create button and select Create SSD Cache. In the SSD Cache Creation Wizard, select the storage volume you created in Step 2 to mount the cache on. Click Next. Choose Read-write cache as the cache mode since you have two SSDs. Click Next. For the RAID type of the cache group, select RAID 1. Click Next. Select both of your installed M.2 NVMe SSDs to be part of this cache group. Click Next. You can then allocate the cache size. Click the Max button to allocate the entire usable capacity (approximately half the total capacity due to RAID 1). Click Apply. You will receive a warning message about data erasure on the SSDs. Click OK to confirm.
Step 4: Creating User Accounts and Shared Folders
Creating User Accounts
To allow others to access the data and services on your Synology DS423+, you will need to create individual user accounts. Open Control Panel from the DSM Main Menu. Navigate to User & Group. Click the Create button and select Create User. Follow the User Creation Wizard to enter the user's name, description (optional), email address (optional, but useful for password recovery), and a strong password. Click Next. Assign the user to relevant groups (e.g., "users", "administrators"). It is generally advisable to adhere to the principle of least privilege and avoid granting administrator rights unless absolutely necessary. Click Next. Assign permissions to shared folders for this user. You can grant Read/Write, Read only, or No access permissions for each shared folder. Click Next. You can set a user quota to limit the amount of storage space this user can use (optional). Click Next. Assign application permissions to control which applications the user can access (optional). Click Next. You can set up speed limits for different services for this user (optional). Click Next. Review the settings and click Apply to create the user account.
Creating Shared Folders
Shared folders are the primary way to organize and store your files on the Synology NAS, making them accessible to authorized users. To create a shared folder, navigate to Control Panel > Shared Folder. Click the Create button and select Create Shared Folder. Enter a name for the shared folder and optionally a description. Choose the storage pool you created as the Location. Configure optional settings like hiding the folder in network places, enabling the recycle bin, and enabling data checksum for advanced data integrity (recommended). Enabling data checksum helps ensure the integrity of your data by detecting and potentially correcting errors. You can also encrypt the shared folder for added security. Click Next. Assign permissions to the created users and groups for this shared folder, defining their access level (Read/Write, Read only, No access). Click Apply.
Step 5: Implementing Essential Security Settings
Disable the Default "admin" Account
Securing your NAS should be a top priority. One of the first steps is to disable the default "admin" account. Navigate to Control Panel > User & Group > User. Select the "admin" account, click Edit, and either disable the account or rename it and use a strong, unique password. Ensure that you have created another administrator account with a strong password before disabling the default one.
Enable Auto Block
To protect your NAS against brute-force attacks, enable the Auto Block feature. Go to Control Panel > Security > Protection > Auto Block. Tick Enable auto block and configure the settings for login attempts and block expiration to automatically block IP addresses with repeated failed login attempts.
Enable Account Protection
For an additional layer of security against brute-force attacks, enable Account Protection. Navigate to Control Panel > Security > Account > Account Protection. Tick Enable Account Protection and configure the settings to further mitigate unauthorized access attempts.
Turn on the Firewall
Activating the firewall is crucial for controlling network access to your NAS. Go to Control Panel > Security > Firewall. Tick Enable firewall and configure firewall rules to allow access from your local network as needed, while blocking unauthorized external access.
Enable 2-Factor Authentication
Enhance the security of your administrator account (and other user accounts if desired) by enabling 2-Factor Authentication (2FA). Go to Options (user icon in the top-right) > Personal > Account > 2-Factor Authenticationand follow the setup wizard. 2FA adds an extra layer of security by requiring a second verification step beyond just your password.
Utilize Security Advisor
Synology's Security Advisor is a valuable tool for identifying and addressing potential security weaknesses on your NAS. Open Security Advisor from the DSM Main Menu and run a scan. Follow its recommendations to improve the security posture of your DS423+.
Consider Disabling QuickConnect
If you do not immediately require remote access to your NAS, disabling QuickConnect can slightly enhance security by reducing potential external access points. You can disable it in Control Panel > External Access > QuickConnect.
Enable Snapshots
For important shared folders, enable snapshots using the Snapshot Replication package (install from Package Center). Configure a suitable snapshot schedule and retention policy to protect against accidental data loss or ransomware by allowing you to revert to previous versions of your files.
Schedule Data Scrubbing
Regular data scrubbing helps maintain the integrity of your storage pool. In Storage Manager > Storage, select your storage pool, click Action, and choose Data Scrubbing. Configure a recurring schedule (e.g., every 3-6 months) to check for and fix data inconsistencies within your RAID array.
Schedule SMART Extended Tests
Monitor the health of your hard drives by scheduling SMART Extended Tests. In Storage Manager > HDD/SSD, select your drives, click Action, and choose Health Info. Go to the SMART tab and schedule Extended Tests (e.g., monthly) to proactively identify potential drive failures.
Essential Security Settings Checklist:
| Security Setting | Status (Yes/No) |
|---|---|
| Disable the default "admin" account | |
| Enable Auto Block | |
| Enable Account Protection | |
| Turn on the Firewall | |
| Enable 2-Factor Authentication | |
| Utilize Security Advisor | |
| Consider disabling QuickConnect | |
| Enable snapshots (for important folders) | |
| Schedule Data Scrubbing | |
| Schedule SMART Extended Tests |
Your Synology DS423+ is Ready
By following these detailed steps, you have now successfully completed the essential software configuration for your Synology DS423+. Your NAS is now prepared to serve as a central hub for storing, sharing, and safeguarding your valuable data. As you become more comfortable with your NAS, remember to explore the vast array of other features and packages available within DSM. Synology's comprehensive Knowledge Base remains an invaluable resource for delving deeper into these advanced functionalities and further customizing your NAS experience.